Introduction
MacBook users often overlook the importance of optimizing display and color profiles, but these settings are vital for enhancing your viewing experience, conserving battery life, and ensuring accurate color display. Whether you’re adjusting brightness for outdoor work or selecting the best color profile for photo editing, understanding these features can significantly improve your MacBook experience. In this guide, we’ll explore everything you need to know about MacBook screen brightness and color profiles.
Adjusting Screen Brightness
Your MacBook offers multiple ways to adjust brightness to suit your environment. Here’s how you can do it:
- Using Function Keys: Most MacBooks have dedicated F1 and F2 keys to decrease or increase brightness. Simply press these keys to adjust per your need.
- Control Center: Click the Control Center icon in the top-right corner of your screen. Use the Display slider to fine-tune brightness levels.
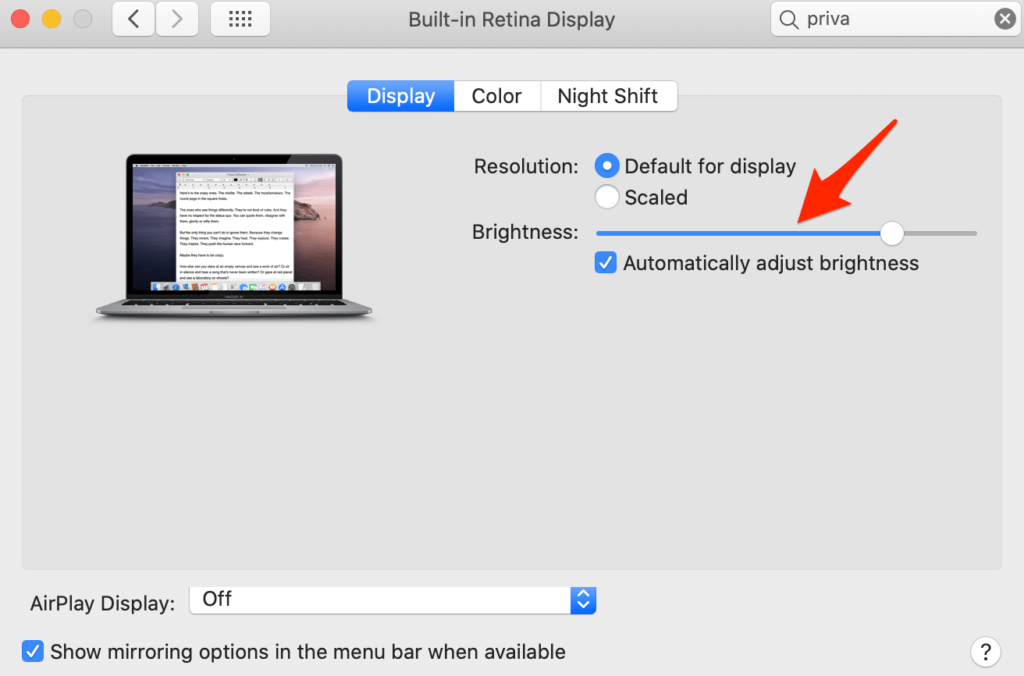
- System Preferences: Navigate to Apple Menu > System Preferences > Displays. Use the Brightness slider to set your preferred level.
- Automatic Adjustments: Enable “Automatically adjust brightness” in System Preferences if your MacBook has an ambient light sensor. This feature adjusts brightness based on surrounding light conditions, saving you from manual adjustments.
Pro Tip: For precise control, hold Option + Shift while adjusting brightness using the function keys.
Learn more about Adjust Brightness: The Best Display Brightness Shortcut for Mac M1
Color Profiles on MacBook
Color profiles determine how colors are displayed on your MacBook screen. Here’s what you need to know:
- What Are Color Profiles? They are predefined settings that adjust how colors appear on your display. Common profiles include sRGB, Adobe RGB, and Display P3.
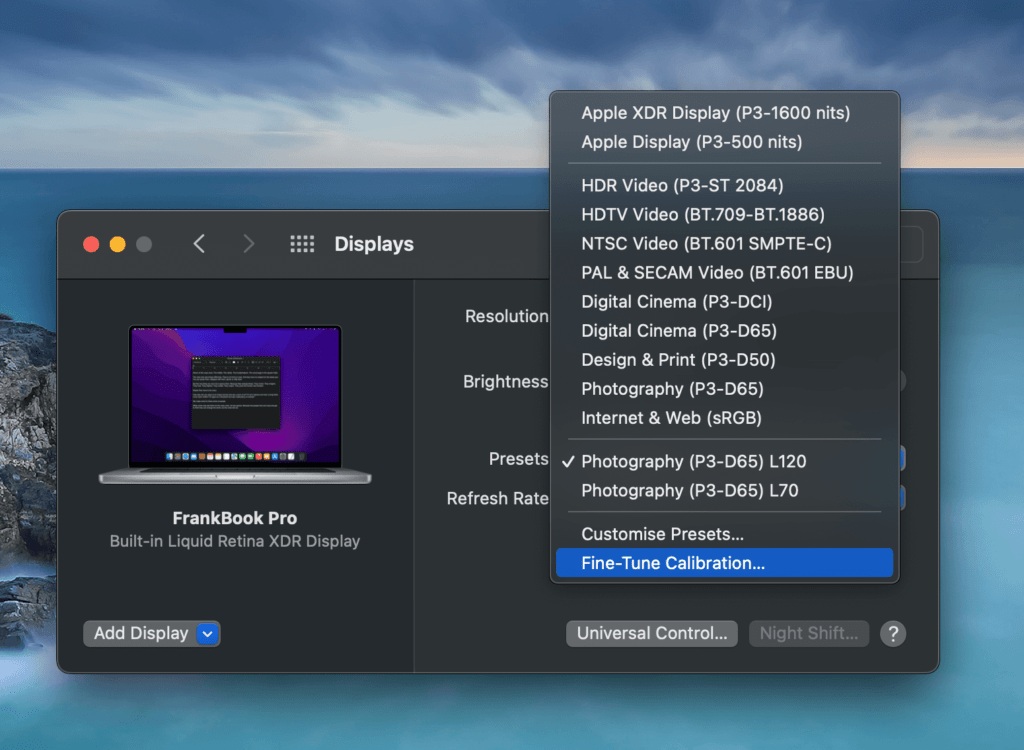
- How to Change Color Profiles: Go to System Preferences > Displays > Color. Select a profile that suits your needs, such as “Photography (P3)” for photo editing or “sRGB” for web browsing.
- Customizing Profiles: Advanced users can create custom profiles using calibration tools like SpyderX or X-Rite for precise color accuracy.
- Best Practices: Designers and photographers should stick to professional-grade profiles like Display P3 for accurate color representation.
Advanced Tips
For those who want more control over their display settings:
- Eye Comfort Settings: Use Night Shift mode (System Preferences > Displays > Night Shift) to reduce blue light in the evening, which helps minimize eye strain.
- Third-Party Tools: Apps like f.lux allow you to fine-tune color temperature based on the time of day.
- Troubleshooting Issues: If your screen dims unexpectedly, check if “Automatically adjust brightness” is enabled. You can disable this feature if it interferes with your workflow.
MacBook Models and Features
Screen brightness and color profile options may vary depending on your MacBook model:
- MacBook Air vs. MacBook Pro: The Pro models typically offer higher peak brightness and better color accuracy due to advanced Retina displays.
- Touch Bar Integration: On MacBook Pros with a Touch Bar, you can quickly change brightness by tapping the sun icon on the bar.
- External Monitors: If you’re using an external display, note that non-Apple monitors require manual adjustment directly on the monitor.
Practical Scenarios
Here are some practical tips for optimizing screen brightness and color profiles:
- Outdoor Use: Increase brightness to its maximum level when working under direct sunlight for better visibility.
- Nighttime Work: Reduce brightness and enable Night Shift mode for eye comfort during late hours.
- Creative Workflows: Use professional color profiles like Adobe RGB or Display P3 when editing photos or videos.
Conclusion
Mastering your MacBook’s screen brightness and color profiles enhances both productivity and user comfort. Whether you’re adjusting settings manually or relying on automatic features, these tools provide flexibility for various environments and tasks. Experiment with different settings to find what works best for you, and don’t forget to revisit these adjustments as your needs change. A well-calibrated display ensures not only a better viewing experience but also improved efficiency in your daily tasks. You can also seek help from apple support.
FAQ
Q: How can I manually adjust MacBook screen brightness?
You can manually adjust MacBook brightness using the function keys on your keyboard. Press F1 to decrease brightness or F2 to increase it. Alternatively, you can use the Control Center by clicking the display icon and moving the brightness slider. For more granular control, go to System Preferences > Displays and adjust the Brightness slider
Q: How do I stop my MacBook from automatically adjusting brightness?
To disable automatic brightness adjustments, navigate to System Preferences > Displays and uncheck the box for “Automatically adjust brightness.” This ensures consistent screen brightness, which is especially useful for tasks like video editing or color correction where fixed brightness is critical
Q: What is the best color profile for creative work on a MacBook?
For creative tasks like photo editing or graphic design, the Display P3 color profile is recommended as it provides a wide color gamut and accurate color representation. You can select this profile by going to System Preferences > Displays > Color and choosing “Display P3” from the list of available profiles
Q: Can I increase my MacBook’s screen brightness beyond its default maximum?
Yes, you can achieve higher brightness levels using third-party tools like Vivid, which unlocks HDR-level brightness for SDR content. This is particularly helpful in bright environments or outdoor settings. Keep in mind that extra brightness may drain your battery faster
Q: Why does my MacBook screen dim when unplugged?
MacBooks automatically dim their screens when running on battery power to conserve energy. To prevent this, go to System Preferences > Battery and disable “Slightly dim display while on battery power.” This will maintain your preferred brightness level even when your MacBook isn’t charging